Flipping heck!

In her comment to my Bad weather,good photos post, Livia asks if it is " ... possible to get your fisherman on the left side."

Easy. Just flip horizontal in Photoshop (or similar).


But is it ethical?

And is it a better image?

I'm not sure. As, in our culture, we read from left to right I feel the photo is better with the man facing into the image from the left side. What do readers think?

"I will break your f*****g camera!"

A couple of days ago, during their lunch break, Troy Holden and Stuart Dixon were taking a walk ... on public property ... through the financial district of San Francisco.

They stopped in front of number 555 California Street (formerly known as the Bank of America Center) to take some photographs. It's a pretty impressive building, being 52 storeys high and the second tallest building in the city.

What happened next, together with a photograph, is recounted by one of them, here.

Oh dearie me. What is it with police and security guards? This happens all over. It happened regularly to me, and to people I knew, when I was living in Zambia.

Are they lacking some critical part of their brain?

Or maybe they have an extra bit of brain that ordinary people don't have, making them honestly believe that any terrorist, before carrying out an attack, is going to stand in front of his/her target, in full view of everyone, get out a camera ... often a big one ... and sometimes a tripod too ... and take photographs. Take photographs in full view. Not hiding. Or anything.

Having an altered brain ... that sounds plausible.

I was reading yesterday about a parasite of cats called toxoplasmosis. It spends part of its life cycle in rats. But the problem it faces is that rats naturally fear and avoid  cats. So the little parasitic beastie could have trouble in getting passed on. To overcome this it has evolved a strategy whereby it alters its host's brain, and infected rats lose their fear of cats. So they get caught, and the parasite moves on. Clever, huh?

Could a similar thing ... sort of in reverse ... be the case with police and security guards? Could something-or-other have happened to their brain making them dislike and fear photographers?

And that raises another question - does this whatever-it-is that changes their brain make them more prone to becoming police and security guards? In other words, does it happen before, and they gravitate towards those sorts of jobs? Or do they catch it as a result of taking up that particular profession?

Medical research is needed.

Bad Weather, Good Photos

If, like me, you live in the Northern Hemisphere, then the bad weather’s a‘coming ... frigid winds ... driving rain ... mist ... snow.

Maybe it has already hit you.

And even if you live in the southern part of the world, with the days lengthening, you’re certain to get some bad weather in amongst it all.

So, when the mist rolls in off the moors, is it time to settle down with a good book in front of a blazing fire?

Definitely not.

Be brave. Get out there into the elements. Bad weather is a time when the vast majority of other photographers pack their equipment away and break out the beers. They don't know what they're missing - opportunities for beautiful and dramatic shots. An approaching storm, a bank of fog, a sudden rain squall, an unexpected rainbow, can all transform the most mundane scenery into something beautiful.

I’ve already blogged about photography in the rain, and ways of protecting your camera, here.

What about mist and fog? There’s a lot of it around here at this time of year, and certain scenes lend themselves particularly well to it. What would fishing be without a bit of fog on the river ...


This shot wasn't intended as 'artistic'. It's deliberately framed to be 'saleable' with space for text to the right. And I chose a position which included the two buoys in the background to give some depth. I used a 300mm telephoto, with the camera on a tripod. The telephoto has accentuated the effect by focussing in on the fog and the subject, causing detail and colours to soften.

Here’s another shot of mine, taken in the depths of winter, up in the Jura mountains behind where I live.


One difficulty with mist is that light levels are much lower so a tripod is essential. You also need to be careful with the white balance as fog can look unusually blue. Set it to ‘cloudy’ for a more natural effect. I feel that the bluish tone in the fishing shot enhances it. But had the tree shot been too blue it would have looked un-natural.

Finally, when photographing in mist and fog, check the front element of your lens regularly as water droplets can condense on it, ruining the clarity of your images.

When the weather turns bad don’t cower inside with your camera idle.

Get out there and get those great shots

Your camera could save a child’s life. A true story ...

One Friday in 2007, Maria and Remo Pezzente were spending a quiet evening sorting through some photos of their children that they’d taken earlier. They were looking for good shots for the family album, and maybe some to send to grandparents.

As they flicked through the images they noticed, with a touch of annoyance, that they hadn’t been careful enough with the camera settings. They'd forgotten to switch to the 'red-eye reduction' mode and their kids were showing the annoying, devilish red glow in their eyes (see ‘What is red-eye?’ to the right).

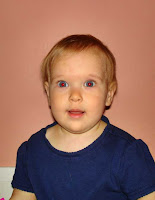
But then they noticed something odd. Whilst their other children had this effect in both eyes, 4-month old baby Leo was different. His right eye was glowing red, his left came out milky white.

They examined him and, although they couldn’t see anything wrong, it was still slightly worrying.

So they did a quick search on the internet and found that this ‘white eye’ effect was called leukocoria. A further search on the word leukocoria brought up the possibility of a retinoblastoma – cancer of the eye.

Now they were really worried. The next morning they decided that this was too important to wait until Monday. They took baby Leo to hospital where he was examined by a paediatrician.

The paediatrician agreed that the photo was odd but, after examining Leo’s eye, couldn’t find anything amiss either. He suggested that perhaps something was wrong with the red-eye reduction feature on the camera. Nevertheless, he felt that it was worth getting a second opinion from an ophthalmologist.

To their shock, the ophthalmologist diagnosed a large malignant tumour in Leo's left eye. Retinoblastoma.

And by Monday morning, Leo had been checked in to the hospital for surgery.

The treatment was successful – the cancer had been caught in time. But that was not the end of Leo’s story. A short while later he lost his vision completely as a malignant brain tumour was found pressing on his optic nerve.

As a result of this Leo had to endure many cycles of chemotherapy. He even had a bone marrow transplant in the week after his first birthday.

But, through their vigilance, Maria and Remo had caught the problem early. The treatments that Leo had to undergo were successful. The tumour shrank away from his optic nerve, Leo regained his vision and is now a happy, energetic boy who is fast approaching his third birthday. (In the centre of this photo.)


And all this  because Maria and Remo spotted something unusual in a family photograph.

So, be aware. If you are taking photographs of a child and one or both eyes come out abnormally white, it is worth a medical check-up. White-eye doesn’t necessarily mean a problem. But it could ... and it could be life-threatening.

Check it out. Your camera can save a child’s life.

Do NOT try this at home ...

Nothing to do with photography ... other than the fact that a camera was used to make it ... but it's had me laughing all week.

And please don't try it for yourself. I want to keep my readers.

Eyes wide open

I’ve had my eyes opened, and I’ve seen what lens designers are up against.


A few days ago I went to the ophthalmologist. She needed to peer deep inside my eyes so she put some magic drops in them. My pupils dilated ... wide ... wide ... and wider.

Because my eyes could no longer select a smaller aperture, the light became painfully bright. The pain was not helped by the fact that the good doctor had thoughtfully decorated her surgery all in white. Furnishings too – white leather – so stylish.

But as I tried to fight off the white, there was something else that puzzled me. Everything had a wide fuzzy halo around it, something like this:

Before the magic drops ...

... and after ...


Then, when, finally, I set off home, car headlights, shop displays, and other points of light had become indistinct starbursts. (I was on my bike, and finding my way was an interesting exercise.)

I knew that, with pupils wide open and I wouldn’t be able to control the amount of light entering my eyes. Hence the painful brightness. But why the halo and starburst effects?

Then it dawned on me. My eyes were working at full aperture and their lenses were showing up all their optical shortcomings. They obviously hadn’t been created by a particularly intelligent designer. There were quite a few faults – reduced resolution and chromatic aberration for starters.

The Japanese are better at it with their lens design computers.

A couple of hours later the effects of the drops had worn off and my pupils could open and close as normal. My vision returned to its usual hawk-like acuity ... well, clear and halo-less, anyway ... and I could move about without feeling I was in some sort of weird, over-lit fog.

The moral of this story?

The performance of lenses gets worse at full aperture. Lens designers go to huge lengths to overcome these faults and, with a good camera lens they are hardly noticeable (it’s a different matter with cheaper lenses).

But, even so, whatever lens you use, try to avoid shooting with it full open. The only reasons to shoot at maximum apertures are if you deliberately want a shallow depth of field, or if the light is so dim it’s the only option.

Outside those situations, shoot at around f8. Almost all lenses – including those in your eyes – give their best performance at middle-range apertures.

The RAW Truth - Part 3

So, I’ve been singing the praises of RAW files. But ... come on ... there must be a downside.

Well ... yes ... I have to admit there is.

For starters, RAW files are larger than JPEG ones, sometimes much larger. As a result you’ll get fewer photos on your memory card. For example, I use a 4GB card. If I set the camera to take JPEG files at the highest quality I can get 375 images on it. If I take RAW photos I can only store 155. That’s fewer than half. A big difference.

But, set that off against the fact that spare memory cards are pretty cheap nowadays and it doesn’t look so bad. And you can buy little portable hard disks that will store photos. I have one, it’s smaller than a paperback book, runs off batteries and can store 40GB. So, when I’m travelling and likely to run out of memory in the camera I simply transfer my photos to the portable drive and wipe the memory card clean.

You could do the same using a laptop computer. In fact, I do both – transfer the photos from my card to my portable hard disk and on to a laptop. I do it every evening. I know it sounds like ‘belt and braces’ stuff, but it greatly reduces the chance of precious photos being lost or corrupted. I always have a backup.

It also stops my memory card in the camera getting too full, with the attendant danger of everything being corrupted (see todays’s PhotoTip).

The second disadvantage of RAW is that you have to work on the files to ‘develop’ the image. And you need some sort of specialised software to do this – Photoshop, Lightroom, a RAW converter supplied by your camera manufacturer, or something similar.

A RAW file is like a digital negative but, instead of working in a darkroom, with the stink of various nasty chemical solutions, you develop your digital image sitting in front of a computer.

And some of the work is quite easy (compared to darkroom work). For example, sometimes I forget to change my camera settings from a previous session and get some horrible results.

On one occasion I’d been taking photographs inside and had the White Balance set to incandescent light. When I stepped outside I forgot to change it ...

I took a whole lot like this before I realised what I'd done. No problem. When I was working on them back at the computer I simply clicked on the ‘White Balance’ tab on my RAW converter, switched it to ‘Daylight’, and hey presto ...

Ansel Adams once said, “The negative is the equivalent of the composer's score, and the print the performance.” If he’s been photographing today he would have said ‘RAW file’ instead of ‘negative’.

So ... to continue with his analogy ... what do you want to do? Turn the musical score into a performance by twiddling the handle of a barrel organ? Or would you rather learn to play it on the piano?

The RAW Truth - Part 2

Interesting ...

I’ve just discovered a Flickr Group called “I Only Shoot In JPEG!!! 99% of the time Raw is Useless

They have this as their 'credo':

Raw is for amateurs! If you can't shoot the photo right the first time out of the camera, then your in the wrong game! ... AMEN!!! This group is for photographers that understand this. and only shoot In JPEG.” (sic)

Ah well ... each to their own I suppose. But would you buy a yacht and never raise the sails? Would you buy a sports car and never change into fifth gear? Would you buy a set of the finest sable paintbrushes for painting by numbers?

So why buy a camera that can shoot RAW images and not use the facility?

RAW files contain the data that has come straight from the sensor, without any processing at all – hence the name RAW. Something has to process, or 'develop' this RAW file into an image.

You can have your camera do this immediately. It will probably use the manufacturer's settings for things such as sharpening and noise reduction. These will have been incorporated into the camera software. Sometimes you can control them a bit, but not much. Then you will get a JPEG file. If you want to make any further changes back at home in front of your computer, such as exposure compensation, you'll have to do it to this already-altered file. A pretty destructive process.

Alternatively you can process the RAW file on your computer, using a conversion program. There you will have complete control over aspects such as sharpening, colour temperature, noise reduction, exposure compensation and so on. What's more, no matter what you do to the file - even if you save it in between - you can always go back to the original.

In the past the RAW-haters had a point. The files were not terribly user-friendly. For example, image viewing programs couldn’t handle them. As a result, most cameras had a setting so that a photo was saved as two different files, one RAW and the other JPEG. The JPEG files enabled you to sort and select the images with your image-viewing program, but the RAW file was the one you ‘developed’ to get the final image.

And ‘development’ is a good analogy. RAW files are digital ‘negatives’. You develop your final image from them ... but not in a darkroom. You do your development in front of a computer.

Back in the days of film I don’t recall anyone shouting, “Negatives are for amateurs! If you can't shoot the photo right the first time out of the camera, then you’re in the wrong game! This group is for photographers who understand this and only shoot Polaroids.”