Great Photographs No. 2 – Fallen Republican Soldier, Spain, 1936


If your pictures aren't good enough, you're not close enough.”


Robert Capa/Magnum Photos

The truth of Robert Capa’s famous quote is borne out by his equally famous photograph. Capa was almost at the feet of this Republican soldier as the man fell during the Spanish Civil War. It is one of the most dramatic and iconic of all war photographs.

Photographers had been recording war ever since the invention of photography in the late 1830s. But, from the Crimean War through to the First World War, they had had to use cumbersome plate cameras that could only take one exposure at a time. This limited war photography to relatively static shots of assembled troops, captured prisoners, battlefield views and the like.

Capa was at the forefront of a revolution taking place – a revolution in photography. This was brought about by the invention of the 35mm rangefinder camera, with 36 exposures on its roll of film. For the first time photographers could move in amongst the troops, capturing spontaneous action and shooting sequences. For the first time photographers could get ‘close enough’ to record the death of an individual.

But this photograph has stirred a storm of controversy.

It was first published in a French magazine Vu in September 1936, followed by publication in Life and Picture Post. The editor of Picture Post called Capa “... the greatest war photographer in the world ...”.

Then in 1975 Philip Knightley, in his book ‘The First Casualty’ challenged the authenticity of this image. Based on the recollections of a reporter who worked alongside Capa, examination of other photographs from the same roll of film and the knowledge that photojournalists of the time did stage dramatic images, Knightley concluded, “... the famous photograph is almost certainly a fake – Capa posed it.”

Robert Capa/Magnum Photos
Another image from the same sequence


And the argument has raged ever since. A definitive answer will never be reached because Robert Capa died in 1954, and no negative of his iconic image is known to exist.

But does it matter how the photograph was obtained?

Even if it was set up, it could be argued that this photograph remains a powerful symbol of the Spanish Republican cause. Tens of thousands of Republican soldiers died, and symbols aren’t necessarily any the less powerful because they have been staged.

There are still deep scars left by that war, and Spain’s Culture Minister, the film director and screenwriter Ángeles González-Sinde, commented on the photograph at the opening of an exhibition of Capa’s work in Barcelona last year. “Art is always manipulation, from the moment you point a camera in one direction and not another,” she said.

That may be true, but it does matter to war photographers and other photojournalists who work in harrowing and dangerous situations. They know that their credibility depends on the trust that the viewing public has in them and their work. Photojournalists have been sacked for ‘manipulating’ their images – Brian Walski, for example.

Walski’s image of a British soldier in Iraq, motioning for a man carrying a child to get down, was Pulitzer Prize material ... except for the fact that it was shown to be a composite. (For an in-depth discussion of that image, see here)

However, whatever your opinion on Capa's photograph - whether you believe it is a fake and so worthless ... or staged but still great ... or true - what isn’t arguable is his courage.

Robert Capa died when, trying to get ‘close enough’, he stepped on a land mine in Vietnam. His camera was in his hand.

Grime Doesn't Pay - Part 3

Digital cameras with interchangeable lenses suffer from grime problem that never affected film cameras ... dust on the sensor.

This is different from dust on the lens. The tiniest specks on the sensor will show up as spots in your photograph, especially on large areas of plain colour, such as the sky. And they become more visible if you are using small apertures such as ƒ16 or ƒ22.

The problem is being addressed by manufacturers and many cameras now have self-cleaning sensors that vibrate at very high speed to shake dust off. How well they work is debateable. But even if they work perfectly, the shaken-off dust is still somewhere inside the camera and could possibly end up on the sensor again

Do you dare check your sensor for dust?

Close your lens down to its absolute minimum aperture, point your camera at a patch of clear blue sky and take a photograph. Don’t worry about the shutter speed. It can be as slow as an arthritic snail and not matter. Dust is what you’re looking for, and it will be sitting in the camera, so shake doesn’t matter.

Having taken your sky photograph, load it into an image editing program and examine at 100% ... and be prepared. If you want a real fright, click on ‘Automatic Levels’. I guarantee, you will find dust specks, even if you have a sensor cleaning system. Even brand new cameras have dust.


Here's my sky photo, taken at f40, with just a few of the dust spots ringed.

Yours may be like that, or better, or worse, but sooner or later you will have to do (or have done) a bit of interior cleaning because you will take a photo like this ...


It's no big deal because you can easily clone out the spot just above and to the right of the balloon, using your image editing program. (You will probably want to clone out those annoying contrails, too). But you don't want to be doing that photograph after photograph. So, you go to your instruction book ... and find an Awful Warning about not doing-it-yourself.

Does that mean sending your camera off to a service lab?

No. In the words of the late, great Douglas Adams – DON’T PANIC.

It is perfectly possible to clean your sensor yourself, if you take a bit of care.

And ... incidentally ... what you are cleaning is not the sensor. It is something called the ‘optical low pass filter’, which is a little bit tougher than the manufacturers would have you believe. (Though this does not mean you can be rough with it.) I’ll call it the sensor, anyway. That’s easier than writing ‘optical low pass filter’ every time.

Although your ‘dust photo’ – the one of the sky – may show many specks,  like mine, I wouldn’t advise cleaning unless they are regularly ruining photographs. If they’re not causing any problems, leave well alone.

Once you do decide to take the plunge, I’d advise a three-step process checking with a ‘sky photograph’ between each step. If, after any step, the dust has vanished, then stop ...

Step 1
Make sure your camera battery is fully-charged* and, working in a dust-free location (the bathroom is ideal for this), take the lens off and lock the mirror up. Then, holding the camera upside down above your head (so any dust will fall out) use your rocket blower to puff vigorously all over the sensor.

As you puff, take great care to ensure that the plastic nozzle of the blower does not strike the metal lens-mounting flange. I learned that lesson when, the first time I was cleaning, I found more and more particles of something coming from somewhere. Guess where?

Step 2
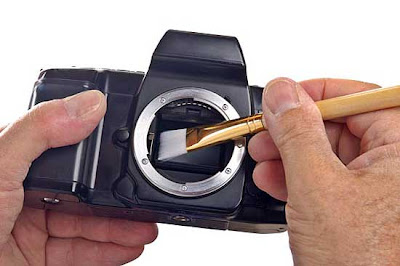
If all that blowing hasn’t shifted the dust, then use a special sensor-cleaning brush with very fine hairs. You spin this at high speed, using a little electric motor to charge the filaments with static electricity. Then draw it across the sensor once so the static attracts the dust particles.


Incidentally – make sure never to touch the brush hairs. No matter how clean your hands are, they are always slightly greasy. Your skin-grease will transfer itself to the brush hairs and thence on to your sensor. Then you will have problems.

Step 3
If some stubborn dust specks are still present then use a swab to shift them. You can buy packs of these, together with specially-formulated cleaning fluid, in photo shops. Make sure you specify the model of camera so that you buy the right size. Take one swab, moisten it with a drop of the fluid and draw it across the sensor once.

 I have applied these 3 steps since I first got my camera and I have only ever had to use Step 3 once.

Finally, I repeat, DON’T PANIC. Unfortunately some photographers do, and become neurotic about dust. They spend an inordinate amount of time trying to avoid it when they should be photographing.

I have seen lens changing bags on sale in camera shops. The theory is that you put your camera and replacement lens into the bag and zip it up. Then you put your hands into sort of built-in gloves, change lenses inside the bag (honestly!) and then take the whole lot out again.

Laugh? I nearly died. Apart from the fact that, by the time you’ve completed that palaver, whatever you were going to photograph has long gone, the bag itself must act as a massive dust trap after a few uses. Unless you’re going to carefully vacuum clean the interior every evening, it’s a complete waste of money.

Dust in your camera is inevitable. For starters, the shutter is mechanical. Every time you take a photograph, it wears a fraction, releasing tiny particles. Then your zoom lens is like an air pump. Every time you zoom in and out you pump air in and out of the camera body, and that’s going to contain dust too.

Dust is everywhere. Live with it, and get on with making photographs.


* Be sure the battery is fully charged before you lock the mirror up because, if the battery dies with the mirror up ... I don’t know what happens. I don’t like to think about it.

Grime Doesn't Pay - Part 2

Dirt on your lens matters ... but maybe not for the reason you think.

Many people believe that a spot of dust on the lens will cause a spot on the photograph.

It won’t. You can have a spot of dust on your lens the size of a small coin and you might not notice it.

Don’t believe me? Here’s the proof ...


These two photographs were taken one after the other, with my camera lying on its back pointing up at the ceiling in the hallway of my house.

I didn’t move the camera between shots. I didn’t change the exposure. Both were taken with the diaphragm fully open, at ƒ1.4. But in one of those photos there is a small Swiss 5 cent coin lying on the lens front element ...


Which photo was taken with the coin on the lens? (Answer in the comments section).

Even if you got it right, I think you’ll agree that it was a tough one to spot.

So, what’s the point of that demonstration? That it’s okay to let your lens get dirty? Even huge chunks of grot won’t make any difference?

No. The point is that dust on your lens has a much more insidious effect which may not be easy to see. A dirty lens lacks contrast and colours in the image are washed-out. The effects occur across the whole image and are impossible to correct with image editing software. Here’s a demonstration ...


So, if you want the crispest, sharpest photographs that your lens can give, with vibrant colours, keep it clean.

How?

Step 1. Make sure that you keep a cap on your lens whenever it is not in use. One will have been supplied with the lens when you bought it. Don’t throw the thing away. And if you have lost it, buy another. Most camera shops carry a selection.

Step 2. Blow any dust particles off with that big fat rubber blower that you used to clean the camera’s exterior. Don’t forget to blow out the inside the lens cap. Dust easily gathers there, too.

Step 3. Gently wipe the surface of the lens. No, not with your shirt-tail, handkerchief or a piece of toilet paper. (You’d be surprised how many people use these things.) With your microfibre cloth. But make sure that the cloth is spotlessly clean. A tiny piece of grit trapped in its folds will play havoc with your coated lens surface. If you want to be really particular, have one cloth for the camera body and another entirely different on for the lens. Or buy some lens-cleaning tissue. Packs of it are very cheap and, unlike toilet paper or paper handkerchiefs, lens-cleaning tissue does not shed fibres. You can also use a drop of optical cleaning fluid to help the process.

Step 4. Finally, give the lens a few hefty puffs with the blower to evaporate any cleaning fluid left or remove any stubborn specks of dust.

Next on 'Grime Doesn't Pay' - Cleaning your Sensor


Footnote:
Incidentally, I didn’t actually let my lens get dirty for the photo above. I used an old skylight filter – one of those clear ones – and coated it with fine dust. The effect is the same. Then I took one photo with the filter off and one with it on and split them down the middle to make a comparison.

Grime Doesn't Pay - Part 1

Fact: if you use your camera, it’s going to get dirty. And if you’re using it seriously it is going to get even more dirty. Photographing interiors? They’re dusty. Beaches are gritty. Flowers shed pollen.

But even if you keep your precious camera carefully wrapped up in cotton wool, the cotton wool itself is made of fibres.

There's more. Your camera is a machine, with moving parts. The shutter, just opening and closing, is going to wear releasing microscopic particles of plastic, metal, or whatever the shutter mechanism is made of.

Grime is grim, wherever it’s found. So, you wash the car, dust the house and brush the dog. But how often do you clean your camera and associated gear?

“Clean the camera myself?” you say. “No way! I’m going to end up with a massive repair bill.”

Not necessarily. Here’s a personal experience. A few years ago I took my camera to have its sensor cleaned by an authorised dealer in the UK (who, because I don’t want to get sued, shall remain nameless). The ‘cleaning’ cost me 30 quid and the camera came out worse than it went in. Since then I’ve done the sensor cleaning myself, in a three-stage process that I’ll describe later in this series.

But first, start out by cleaning the exterior. You can’t hope to get it spotless inside if the outside is dusty. This process is simple. Brush ... blow ... wipe. And here's the equipment you nedd to do the job ...

Cleaning equipment: microfibre cloth, blower, soft brush (this is a man's shaving brush), optical cleaning fluid, cotton bud.

Brush. You can get a dedicated camera brush for this, but you’ll probably pay extra for it. A large, soft make-up brush, or a man’s shaving brush (both of them unused, of course!) will do the job just as well, if not better. And will cost less. Give your camera a good brushing all over to remove surface grit and grot. Then ...

Blow. No, not with your mouth. There are two ways of doing this. Either buy a big fat bulb-type blower, that looks like a hand grenade with a pipe sticking out of the end, or use a can of compressed air. Don’t bother with those diddly little puffer and brushes combined. They’re close to useless. Use a big ‘un. Puff liberally all over the camera body and front element of the lens to shift any particles that have not been removed by brushing. Blow out the inside the lens cap too, as dust can gather there. If you’re using a can of compressed gas be a bit careful. This can spurt liquid propellant if you hold it the wrong way (like upside down). Finally ...

Wipe – using a microfibre cloth. This is a special type of tightly-woven cleaning cloth that has a unique, silky feel to it. You can buy these cloths in photo shops and or at opticians. Get a big one. You could use a well-washed piece of cotton, but cotton tends to shed fibres. In addition, microfibre cloths are good at removing greasy marks, and they prevent scratching. Just remember, you need to keep the cloth clean, too. So give it an occasional wash.

If there are stubborn greasy patches that won’t shift – and let’s be honest, your nose against the viewing screen can leave hard-to-shift marks – then use a dab of optical cleaning fluid. These liquids have been specially formulated to ensure that they don’t damage glass, plastic or coated surfaces, and they evaporate away harmlessly. But, even so, always read the instructions first. Never ever use other solvents like white spirit. Then you may well have a massive repair bill.

Clean the eyepiece of the viewfinder too. This is usually recessed and is a wonderful dust trap. A cotton bud, moistened with some optical cleaning fluid will do the job well. And, while you’re at it, check the dioptre adjustment - the little wheel or lever that sets the viewfinder to your individual vision. It can get knocked out of place during use, or your vision may have altered slightly since you last set the viewfinder. You can’t hope to take sharp photographs if you can’t view them clearly.

Cleaning the eyepiece. Check the dioptre seting at the same time.

Finally, don’t forget your camera bag. It’s no good putting your lovely clean gear back into a bag that’s been gathering dust all year. Empty it out completely, remove all the interior partitions and vacuum clean it. Make sure to get the nozzle into all the nooks and crannies, and suck dust out of the various pockets, too.
Next time round – cleaning your lenses.